
How to Reset and Reconfigure Bluetooth Settings on the Leica DISTO X3
If your Leica DISTO X3 is experiencing Bluetooth connectivity problems, measurement syncing issues with FSS Window Pro®, unexpected behavior, or general performance glitches, performing a device reset is often the fastest way to restore normal operation.
This guide walks you through the manual reset procedure directly on the DISTO X3.
When Should You Reset Your Leica DISTO X3?
Consider performing a reset if you experience:
Bluetooth connection failures
Device not pairing with FSS Window Pro
Measurements not transferring correctly
Frozen or unresponsive screen
Incorrect settings after a firmware update
Unexpected device behavior
Important: A reset restores the DISTO to factory settings. You may need to reconfigure your preferred settings and reconnect Bluetooth devices afterward.
Leica DISTO X3 Manual Reset Procedure
Follow these steps exactly as shown below.
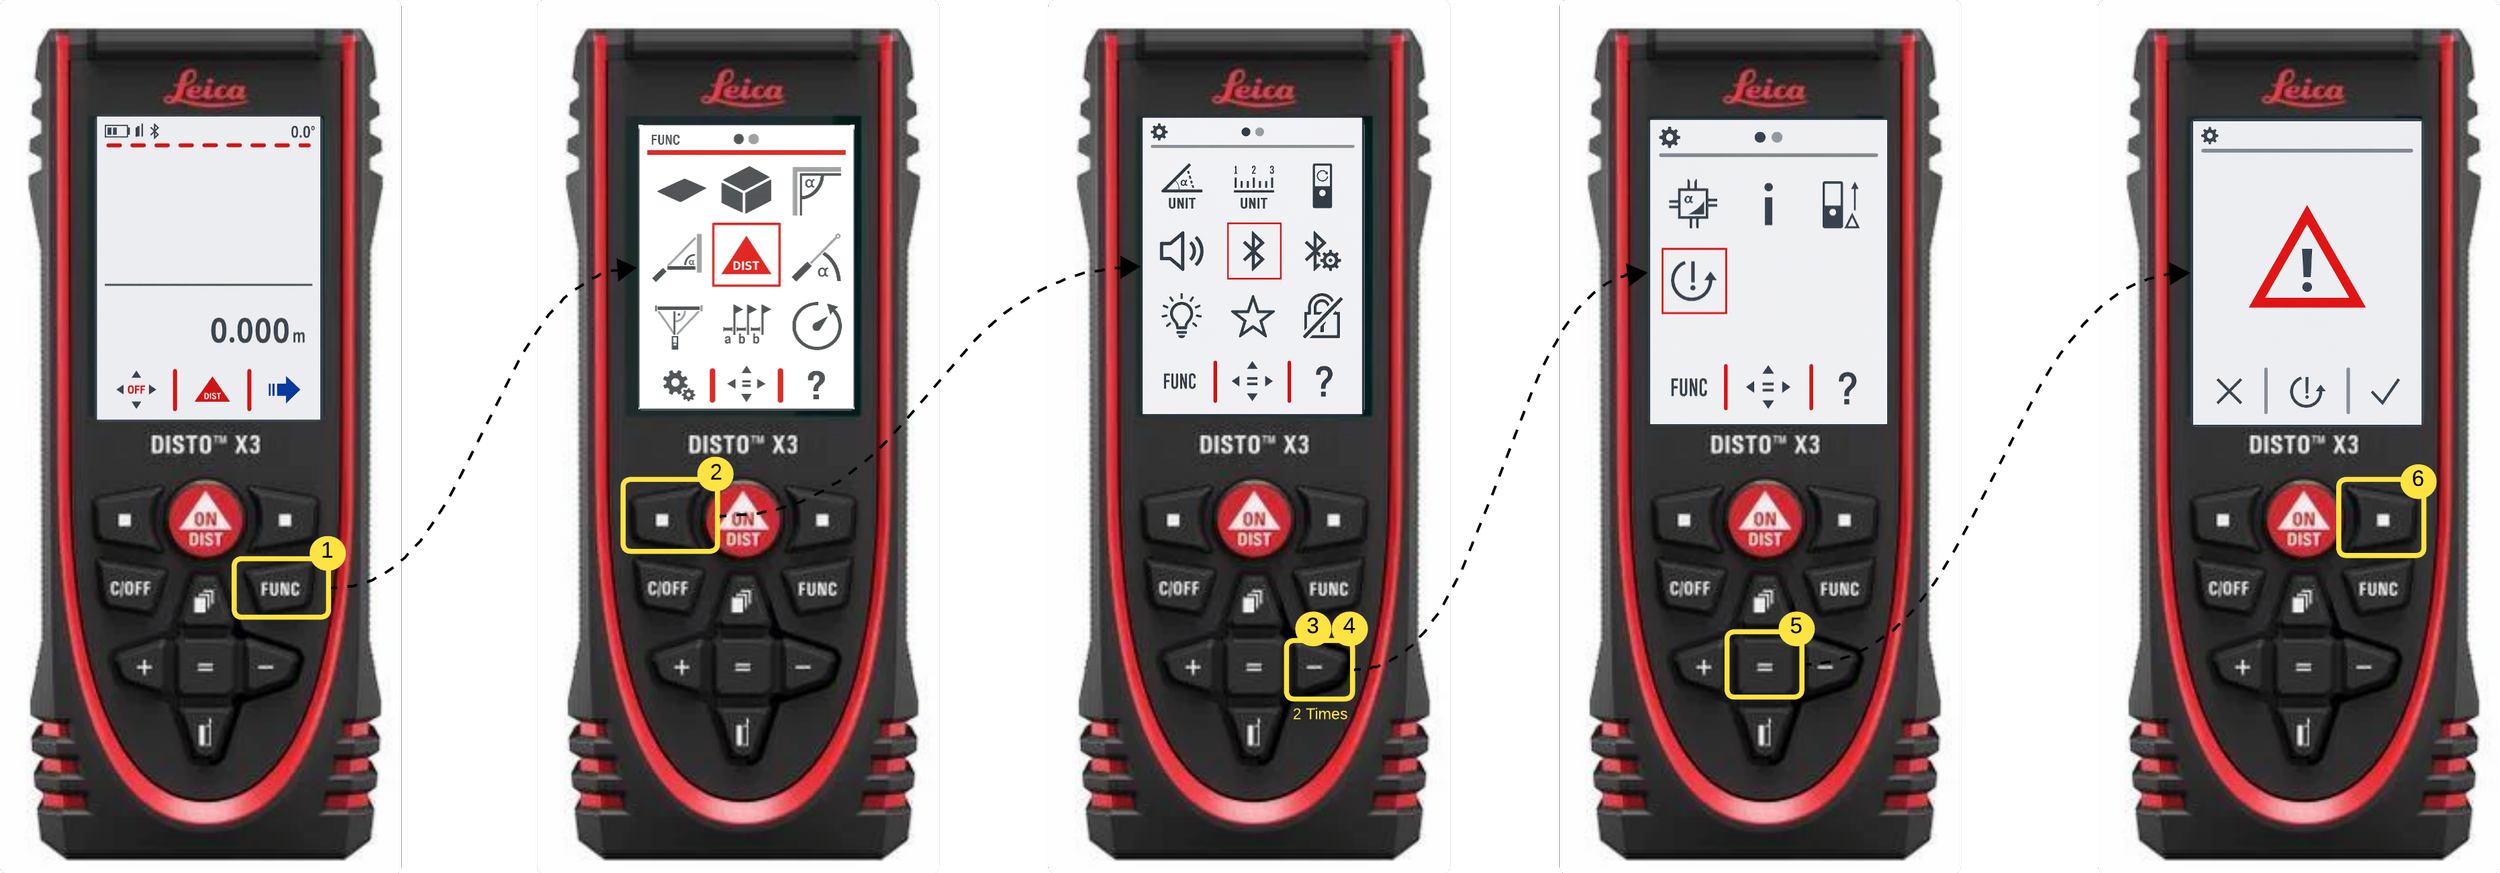
Step 1: From the measurement screen, press FUNC.
Step 2: Select the Settings (Gear) icon.
Step 3: Press the Right Arrow button twice until you see the Reset icon.
Step 4: Select the Reset icon and press the Center button.
Step 5: When the warning screen appears, press the Right Arrow button to confirm.
The DISTO X3 will reset and return to the default measurement screen.
2. Re-Configure Bluetooth Settings
If you've just reset your Leica DISTO X3 or are connecting it to FSS Window Pro® for the first time, it's important to configure the Bluetooth settings correctly. The default Bluetooth settings on the DISTO X3 are not optimized for measurement apps, and incorrect settings can prevent measurements from transferring automatically.
Follow the steps below to ensure seamless communication between your Leica DISTO X3 and the FSS Window Pro® app.
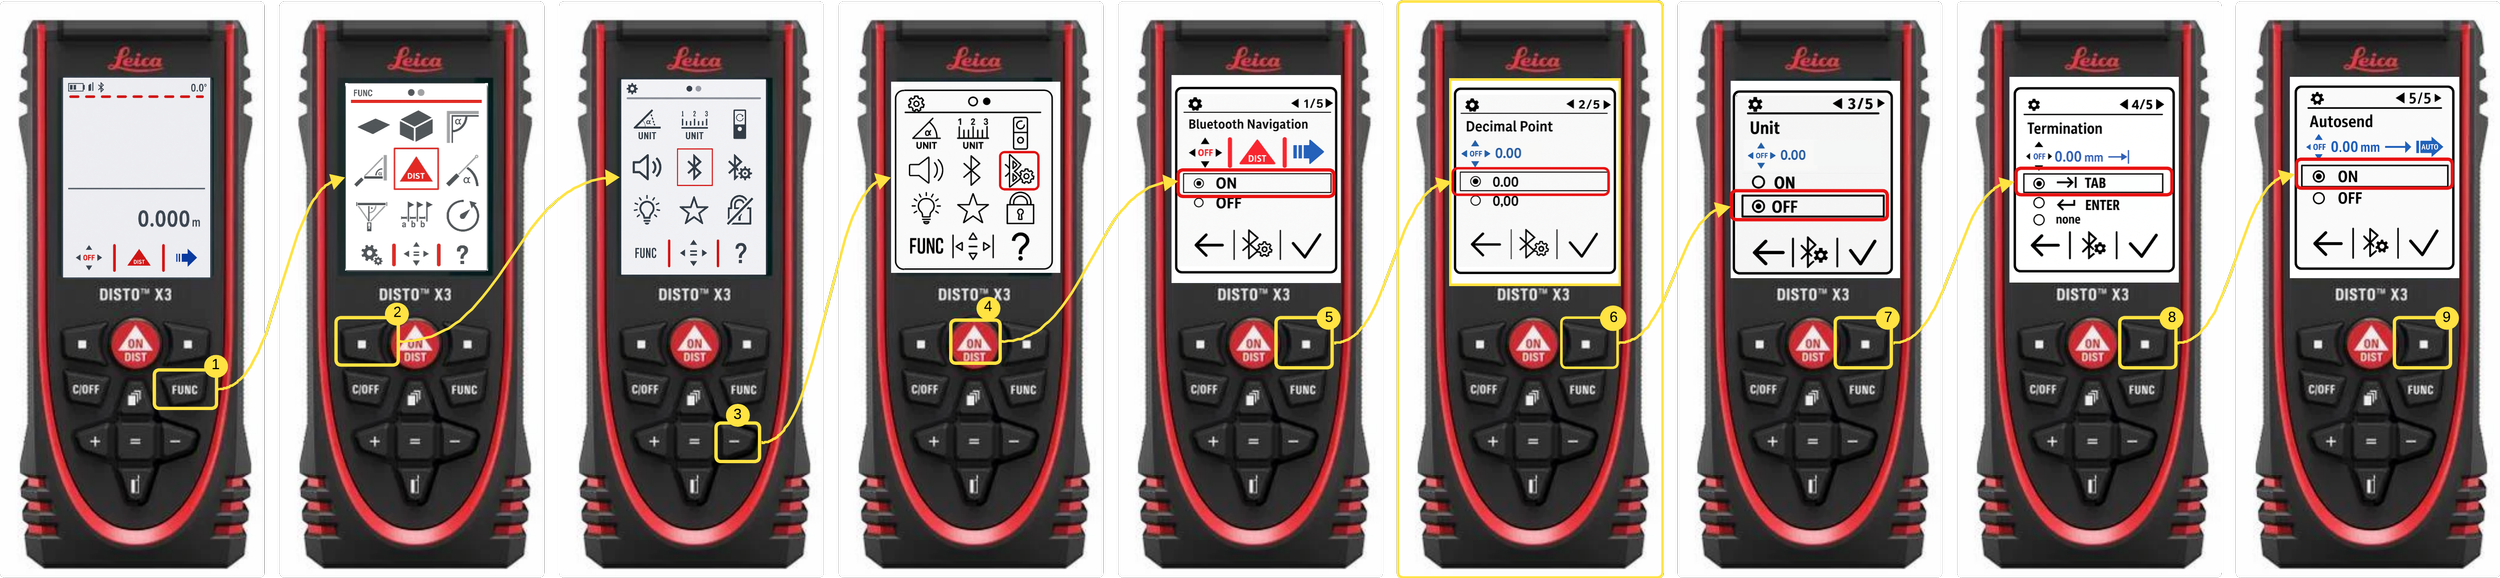
Step 1: Press the FUNC button to open the Function Menu.
Step 2: Press the Left Selection button to enter the Settings menu.
Step 3: Press the Right Arrow (►) button to navigate to the Bluetooth settings.
Step 4: Press the DIST (Red) button to open the Bluetooth Settings.
Step 5: Set Bluetooth Navigation to ON.
Step 6: Set the Decimal Point format to 0.00.
Step 7: Set Unit to OFF.
Step 8: Set Termination to TAB.
Step 9: Set Autosend to ON.
Your Bluetooth configuration is now complete. The Leica DISTO X3 is ready to pair with FSS Window Pro®, allowing measurements to be sent automatically to the active measurement field without any additional button presses.
3. Reconfigure the Unit Preference
If you've reset your Leica DISTO X3, the measurement units will return to the factory default. Follow below steps to set your preferred unit of measurement before pairing with FSS Window Pro®.
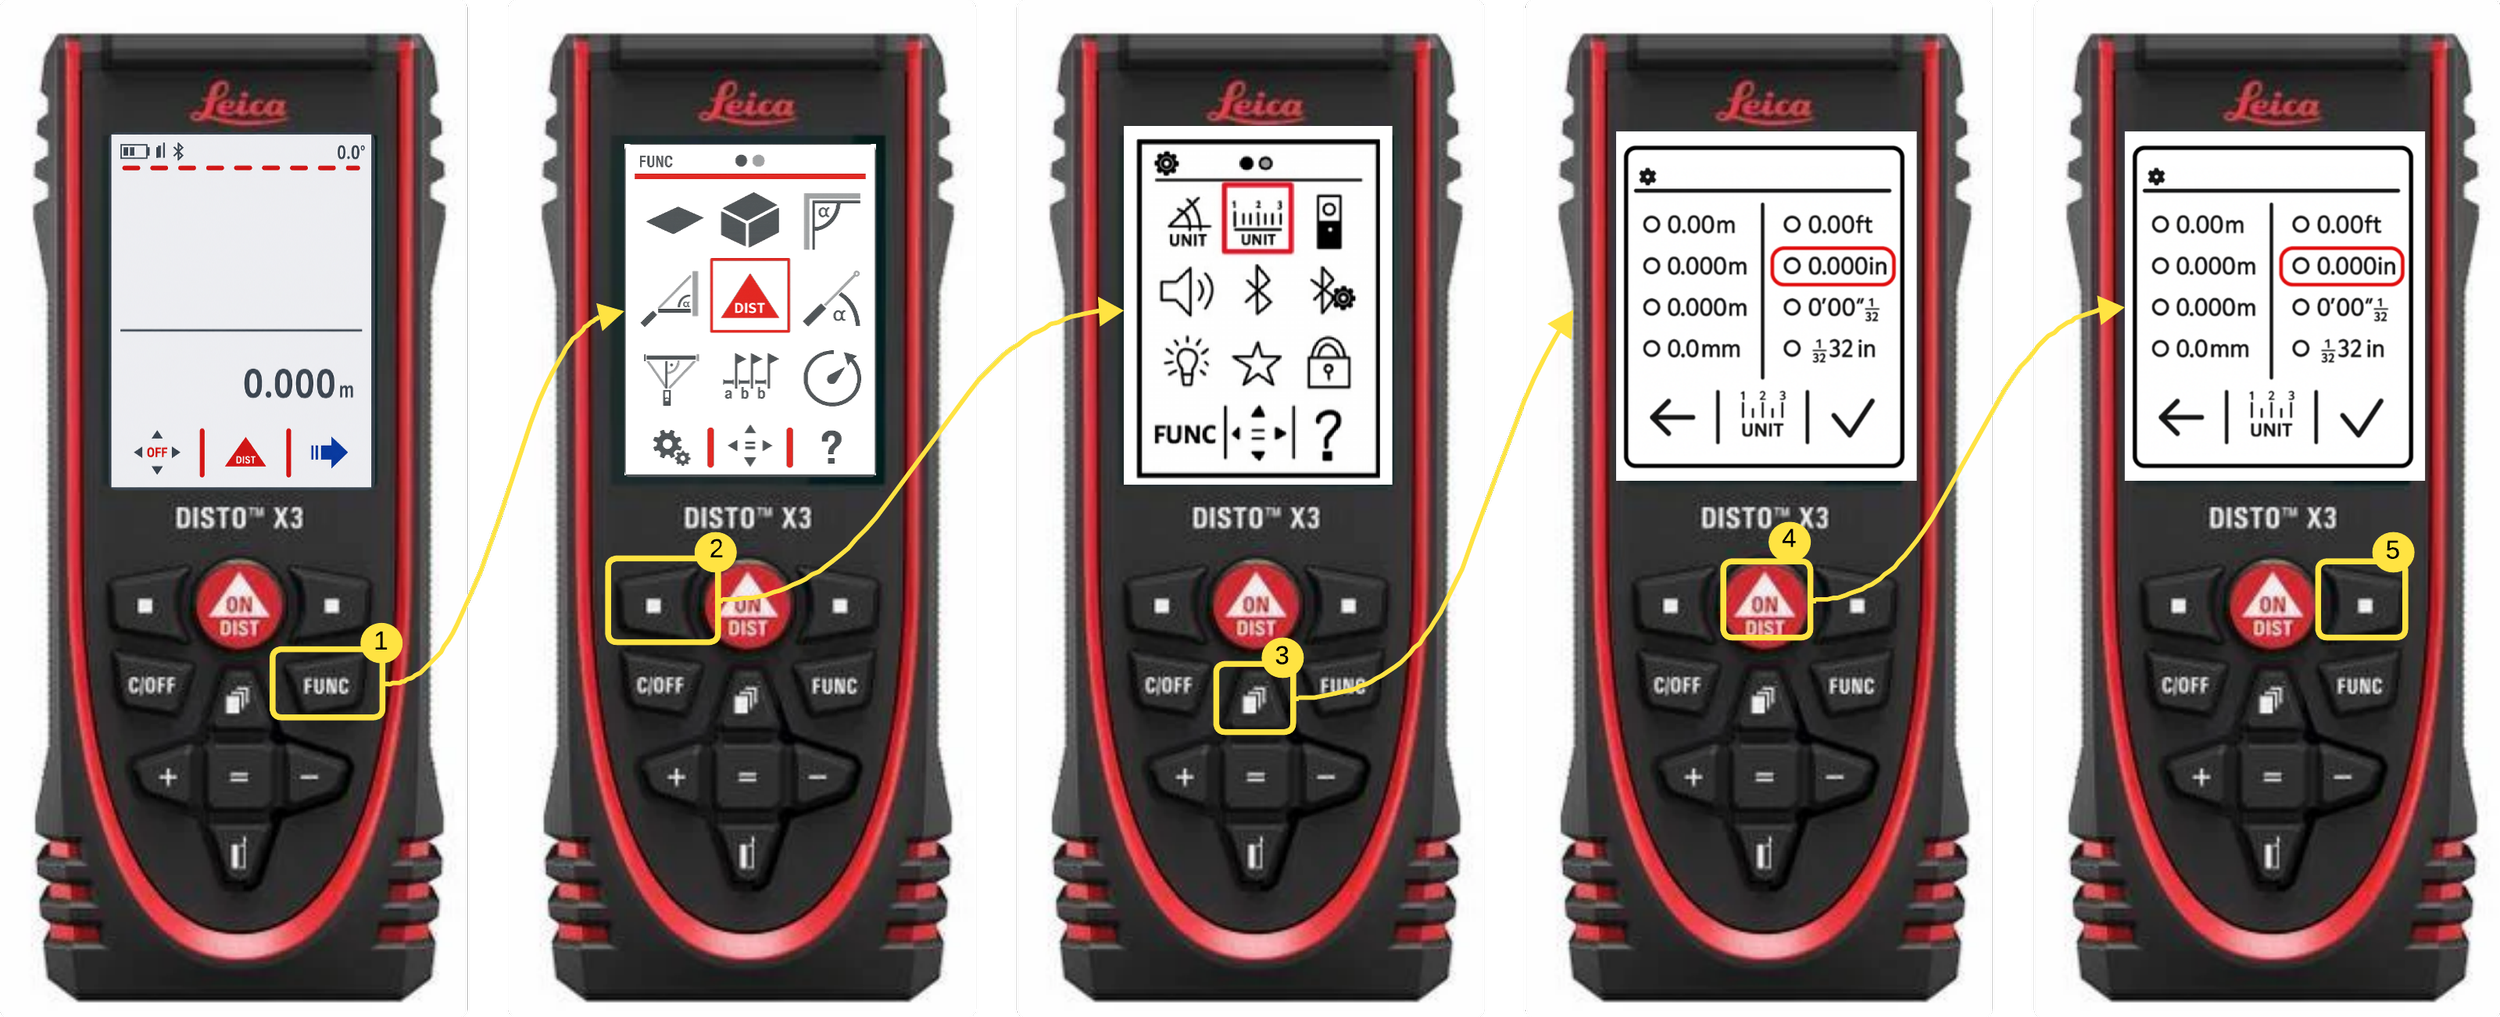
Step 1: Press the FUNC button to open the Function Menu.
Step 2: Press the Left Selection button to enter the Settings menu.
Step 3: Navigate to the Unit icon and press the DIST (Red) button to open the Unit Settings.
Step 4: Use the navigation buttons to highlight your preferred measurement unit (e.g., 0.000 in for decimal inches).
Step 5: Press the Right Selection (✓) button to save the selected unit and complete the setup.
Your Leica DISTO X3 is now configured with your preferred measurement unit and is ready to use with FSS Window Pro®.
Need Additional Help?
If you've completed both the reset and firmware update procedures and are still experiencing issues, contact the FSS Window Pro support team at: support@fssapp.com
Include:
DISTO model number and serial number
Firmware version
Mobile device model, OS version
Description of the issue
This information will help our team troubleshoot the problem more quickly.